Troubleshooting Common Installation Errors in Kali Linux on Virtual Machines
(A beginner-friendly troubleshooting guide to save you from installation headaches!)
Installing Kali Linux in a virtual machine (VM) like VirtualBox or VMware is a great way to dive into cybersecurity without messing up your main system, if you follow the proper guidelines on how to install Kali Linux in VirtualBox. But let’s be real, sometimes things go wrong, and error messages can feel like they’re written in alien code. If you’ve ever stared at a frozen installer or a cryptic error, don’t panic! I’ve been there t
oo, and in this guide, I’ll walk you through the most common Kali Linux VM installation fails and how to fix them.
1. Stuck at “Installing the Base System” or Kernel Errors
What’s happening?
- – The installer freezes at “Installing the base system”
- – You see errors like:
* Failed to install linux-image-amd64
* The kernel could not be installed
Why?
- – Your VM might be low on RAM
- – The ISO file could be corrupted
- – No internet connection during installation (yes, Kali needs this!)
How to Fix It:
- – Give your VM at least 2GB RAM (4GB is better if you can spare it).
- – Verify the ISO checksum before installing (bad downloads happen!).
- – Enable internet access in your VM settings (NAT mode usually works).
- – Use the 64-bit ISO if your PC supports it (most do these days).
(Pro Tip: If it keeps failing, try a different Kali ISO version—sometimes the latest one has quirks.)

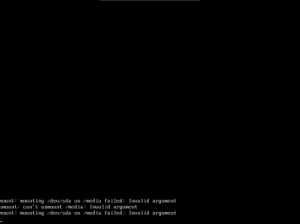
2. “Mount: mounting /dev/sda on /media failed: Invalid argument”
Error Message:
mount: mounting /dev/sda on /media failed: Invalid argument
Why?
- – You might have messed up disk partitioning
- – Wrong filesystem type (like trying to use NTFS instead of ext4)
How to Fix It:
- – Choose “Guided – Use Entire Disk” (unless you really know manual partitioning).
- – Format as ext4 (Kali prefers this over NTFS/FAT32).
- – Recreate the VM if partitioning is completely broken.
(If you’re not sure, stick with the automatic installer—it’s way easier!)

3. Partitioning Errors
The Problem:
- – The installer complains:
- – “No root file system is defined”
- – “Failed to install GRUB bootloader”
How to Fix It:
✔ In manual partitioning:
- – Set / (root) as ext4 (at least 10GB).
- – Add a swap partition (optional but helpful).
- – Mark the disk as bootable!
✔ If GRUB fails:
- – Reboot and select “Force GRUB installation” in advanced options.
(Still stuck? Try reinstalling with “Guided Partitioning” instead of manual.)
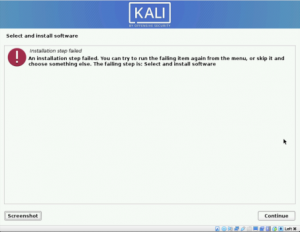
4. “An Installation Step Failed” during “Select and Install Software”
What’s happening?
- – The installer crashes when trying to install extra software (like the desktop environment).
Why?
- – No internet connection (Kali tries to download packages mid-install).
- – Corrupted ISO (bad download strikes again).
How to Fix It:
- – Check your VM’s network settings (use NAT or Bridged mode).
- – Skip extra software during install—you can add it later with:
– sudo apt update && sudo apt install kali-linux-default
🔄 Try a different Kali ISO if it keeps failing.
(Fun fact: You can install Kali with just a command line first, then add a GUI later!)

Many of the installations happen due to a lack of fundamentals, that’s why cyber security training with hands-on lab exposure helps learners avoid common mistakes whenworking with Kali Linux
5. “No space left on device”
Error Message:
No space left on device
Why?
- – You gave the VM too little disk space (Kali needs at least 20GB).
How to Fix It:
Resize the VM disk (if using VirtualBox):
VBoxManage modifyhd kali.vdi –resize 30000 # Expands to 30GB
Or, just recreate the VM with a bigger disk (easier for beginners).
(Pro Tip: Use dynamically allocated storage so the disk grows as needed.)
Final Tips for a Smooth Kali Linux Install
🔹 Use the latest Kali ISO (get it from kali.org).
🔹 Enable virtualization (VT-x/AMD-V) in your BIOS for better performance.
🔹 Allocate enough resources:
- – 2+ GB RAM
- – 2 CPU cores
- – 20GB+ disk space
🔹 Check logs if stuck ( Ctrl + Alt + F4 switches to terminal view).
Wrapping Up
Kali Linux is an amazing tool, but VM installations can be tricky. If you hit a wall, don’t give up! Most errors are fixable with the right tweaks. Which error did you run into? Let me know in the comments—I’ll help troubleshoot! (And if this guide saved you hours of frustration, share it with another aspiring hacker!)
For further reading on similar topics, check out article on : How to Configure Network Adapters in VirtualBox: A Complete Guide


